Removing the front bumper on a 2019 Chevy Silverado can feel challenging if you’ve never done it before, but this video breaks the entire process down into simple, easy-to-follow steps. Whether you’re performing repairs after minor damage, upgrading to an aftermarket off-road bumper, replacing fog lights, or accessing components behind the bumper, this guide gives you everything you need to get the job done the right way.
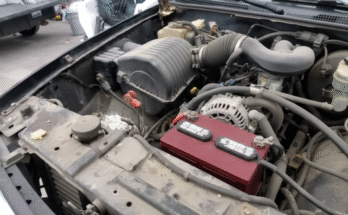
In this step-by-step tutorial, you’ll see exactly where every bolt, screw, and clip is located on the 2019 Silverado front bumper assembly. We take you through the process slowly, showing close-up shots of fasteners, plastic push clips, grille attachments, wheel well bolts, lower skid plate connections, and the bumper reinforcement points. The video is designed for everyday Silverado owners, not just professional mechanics, making it simple for anyone to follow along confidently.

The tutorial begins with the tools required, including sockets, extensions, screwdrivers, trim removal tools, and optional items that make the job easier. You’ll learn how to safely lift the vehicle if needed, how to remove the front air dam, and how to disconnect electrical components like fog lights or sensors if your Silverado is equipped with them. Every step is shown clearly to prevent mistakes, reduce the risk of scratching the paint, and help you complete the bumper removal without damaging mounting clips or wire harnesses.
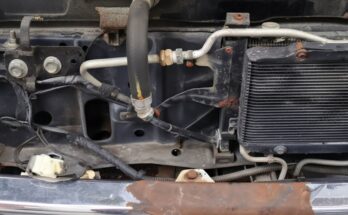
As the video continues, you’ll see how to detach the wheel well liners for better access, loosen the bolts behind the front fender, and remove the impact bar connections if required for deeper repairs. These steps are especially helpful for Silverado owners upgrading to steel bumpers, installing winches, replacing the front grille, or modifying the truck for off-road use. The process applies to most 2019 Silverado trims, including LT, RST, LTZ, Custom, and High Country, with minor variations noted along the way.
This video is perfect for DIY truck owners who want to save money on labor costs and learn more about maintaining their vehicles. By following each step carefully, you can remove the front bumper safely and reinstall it with no issues. We make sure to explain how to check alignment, reattach wiring properly, and tighten bolts in the correct order when reinstalling everything.
If you’re working on a collision repair, installing LED lighting, replacing parking sensors, or simply want to understand how your Silverado’s front-end assembly is built, this video provides everything you need. Be sure to watch all the way through for final tips that can help you avoid common mistakes and ensure a clean, professional-looking job.
Don’t forget to like the video, leave a comment if you need help with anything, and subscribe for more Silverado repair, upgrade, and maintenance tutorials.